 |
"Before" shot — from back in 2011,
just after the Big Earthquake. |
The time has come, after only 25 years or so of hating the terrible lino tiles in our toilet, to do something about them.
I figured, since I was going to be renovating the floor, I might as well gussy the whole thing up a bit, so that we can poop in style. Or at least, less squalor.
 |
Tiles plus floorboards plus glue.
The blue thing is the door. |
Here are the offending tiles. They're crap.
Underneath them is a disgusting black glue residue that needed to be removed as well.
The tiles come up easily enough with a plastering spatula, though they tend to break into pieces in the process, but that glue residue is a different matter. It needs sterner measures.
I hit it with a hot-air gun and a scraper; a stinky, smoky, unpleasant job. It didn't take all that long I suppose, but it seemed a lot longer because of the cramped conditions and the contortions required to work around the toilet bowl.
 |
| The floor, after initial scraping and sanding. |
The floorboards are matai, which is a rather nice wood. It was much used for flooring back in the Olden Days, when New Zealand's native forests seemed inexhaustible, and it was usually called Black Pine. It's still used, but these days it's frighteningly expensive.
The old iron nails have rusted and stained the wood around them, but I don't mind that too much. When the wood is eventually finished, it will be a lot darker in any case.
 |
| Borer! Fucking borer! |
Having taken the surface off the timber with a belt-sander and a 40-grit belt, it is revealed that borer have been having a fine old time munching their way through the innards of the planks. The little bastards avoid the heartwood, but most of these planks are sapwood and thus a prime borer target.
Well, worse things happen at sea. My lovely polished wood floor is getting to be more rustic and distressed by the minute. Hey-ho.
I was tossing up between polyurethane or an oil finish of some kind, but I now learn that the resins in matai don't work or play well with oils, so I suppose polyurethane it shall be.
 |
| The line of demarcation. |
Eventually, I intend to get rid of the tiles from the rest of the laundry area as well, but for the moment I've just stopped at the border. First things first; I'll get the toilet finished first.
 |
| Beading, dado rail, light port, shelf. |
In an attempt to make the fairly shonky tongue-and-groove panelling look a bit less shabby, I've added some 20 mm quarter-round beading in the corners to disguise the gaps where the boards were just butted up against each other. I've only added beading above the shelf thus far; I'll be putting in moulded skirting boards, so the lower beading will have to be cut to conform with those.
Oh yes, the shelf is new too. I added one from wall to wall to replace the ricketty little corner shelf that used to perch precariously beside the cistern.
I also added a dado rail, not for any particular functional reason, just to provide a three-dimensional accent at the line of division where the colours change. The lower part of the walls will be gloss white; above the dado rail the walls and ceiling will be a dark satin ultramarine blue.
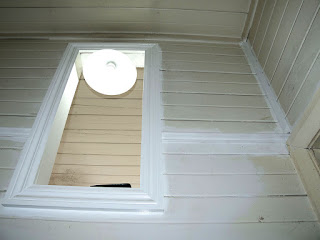 |
| And lo! There was light! Again! But more! |
The original cut-out for the light which serves both the toilet and laundry was a miserable little affair; pretty much just a square hole cut in the wall. It didn't let in much natural light at all, and it was so small that it also blocked quite a bit of light from the bulb.
I extended the hole down substantially to allow a bit more natural light in when the light is switched off, and gave it a proper case and moulded frame. It's still a bit shonky in the top-plate, but I didn't fancy dealing with any rewiring, so it can stay that way until I get way more enthusiastic.
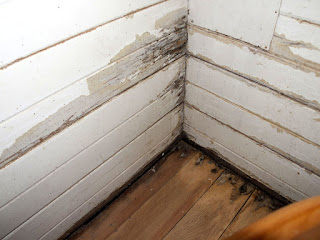 |
| Ach! Rot! Maybe! |
In the back left corner, there's a patch where the ends of the panelling boards got sodden when we had a leak. That was quite a few years ago, and the damage hasn't spread — I had a decent dig around at it, and the wood isn't spongy at all, which leads me to hope that it's just water damage and not a living fungal infection.
In any case, even if it is alive, if it progresses as slowly as it has over the last decade, I'll be long dead before it becomes a major issue. So, I just intend to paint over it, and will only go to the trouble of cutting everything out and replacing it if it shows itself to be worth it. Hopefully it will remain inert.
November 26th
 |
| The Beginning of the Blue |
I've started painting the ceiling and walls above the dado, and have discovered just what an amazing pain in the arse it is to paint old tongue-and-groove panelling.
It's not helped by the fact that the colour I've chosen doesn't have spectacularly good covering qualities, so I expect I'll be needing at least three coats.
 |
| Peeing DENIED! |
In addition, I'm having to pee out in the back yard like a primitive cave man, owing to the inconvenient barrier formed by my painting platform.
Mind you, though an inconvenience right now, this multi-section ladder makes life very much easier here than it would be if I were trying to maneuver a step-ladder around the toilet bowl to get at the high places. So there's that, I suppose.
 |
| Dang! More paint needed. |
It would appear that hoping for coverage with as few as three coats was unwarranted optimism. It'll need at least one more, and possibly two in some spots.
Well, I have a little paint left, and when that's gone, that's it. If it's still blotchy then, I'll just have to rely on gloom and people not looking up a great deal while they're straining on the loo.
Later: one more coat did the trick, thank goodness. It's a beautiful blue, but I'm glad I'm not applying it in a larger area than this.
November 27th
A brief (I hope) hiatus occurs while I get a nasty painful infected finger seen to. My plans for the day included a fair bit of orbital sanding, and I very much doubt my finger would enjoy that much vibration in its current state. I will not include a photo of the finger, because bleeuch.
 |
| Looks like a mitre joint.... isn't. |
In lieu of anything more vigorous, I just prepared the skirting boards, cutting them to length and cutting the ends with fake mitres.
 |
| Cunningly cut to fool the eye |
To do this, you need to cut the end of one board to match the profile of the other. When they're mounted against each other, you get what appears to be a mitred joint, but isn't really.
It's actually a bit more troublesome than cutting a genuine mitre, especially when one has a nice Makita mitre saw which does that sort of thing easy-peasy, so why do it at all? There are a couple of reasons.
- Once a genuine mitred set of boards is locked in place and secured, you can't disassemble them without actually cutting or breaking at least one of the boards. With this system, you can simply remove the boards with a pry-bar or something with minimal fuss or damage.
- The cut profile disguises the end of the other board, so it gives you a bit of leeway in length, which makes it easier to get a board into a space that is blocked at both ends, as are most walls.
You'd think that cutting the matching profile accurately would be tricky, but it's not really. Here's how you do it.
 |
| Cut along the upper edge of the 45° bevel. |
First, you cut the board squarely at 45° across its end, with the bevel running away from the moulded profile (i.e. the straight edge should be at the back face of the board). The resulting bevel will have a top edge that precisely matches the profile of the board.
I like to run a pencil along this edge to delineate it clearly; otherwise it can be difficult to see since all the wood is the same colour.
Then you just cut along that line with a coping saw or scroll saw. Easy as that.
The more accurate your cutting, the more seamlessly the two pieces will butt up together.
November 30th
The disgusting finger-full-of-pus having been attended to, and scary-looking antibiotics being swallowed, it's back on with the show. Now it's time to varnish the floor so that I can mount the skirting boards so that I can add the last of the corner beading so that I can paint the walls and then be FINISHED.
 |
| A place to stand |
It's not quite as straightforward as it might be, because the polyurethane takes quite a while to cure, and I need to allow for access to the toilet during that time.
Therefore, I'm doing it in two stages — down the back and around the edges first, so that I'll have somewhere to rest the end of a temporary duck-board arrangement over the second stage, which is the bit of the floor where one's feet rest.
I could do it the other way around, but this way has the advantage that I can get on with fixing the skirting boards and what-not while the second-stage polyurethane is curing.
I think I'll be needing three coats, so that's quite a lot of curing time. You can see how much the varnish darkens the timbers.
 |
| Another place to stand |
Several days later...
The floor ended up needing four coats of varnish, and to get at the toilet while the centre section was curing, I set up this causeway using my trusty wooden stepladder and a board to put one's feet on.
It worked OK, except that by raising me up 150 mm or so, standing while peeing felt like aiming for a bucket from on top of a high-diving tower. I don't know how tall guys do it without getting urine everywhere — just practice, I guess.
Anyway, I found it easier to sit down, though then I was forced into a rather uncomfortable squatting posture. They say that pooping in that posture is better for you, but I have to say it felt very odd.
Who'd have thought that six inches would make such a difference?
December 3rd
 |
| Almost there |
 |
| Fairing in the beading |
I've got the skirting fixed in place now, and the last of the corner-beading.
The beading had to be cut to match the profile of the mouldings supporting the shelf, and that proved to be a bit trickier than I had expected because the moulding is different to the one I used for the dado rail, and I had none left to use as a template.
Fortunately, I managed to make an acceptably accurate cutting template out of a bit of cardboard, and filler covers a multitude of sins.
All that's left to do now is to undercoat and paint the walls, and I'll call it done. And none too soon either; I'm getting a bit sick of it now.
 |
| Dunny done. |
December 4th — Finished at last.
So, it's done. All bar putting the door back on its hinges. The paint needs a day or so to harden properly, then the shelves can be restocked with books.
I had to stitch a couple of photos together to get everything in. Regrettably, that makes the architecture look a bit German Expressionist, so you'll just have to imagine that the walls are actually vertical and (reasonably) straight.
We might possibly have to get a new cistern, because now the old one looks even more yellowed and scungy than it did before. But that's not a very high priority for me right now.


