Monday, December 28, 2020

Shoe Shine Box


Yesterday, I went to use our shoe-cleaning stuff, and finally got fed up with the ratty old cardboard box that we've been keeping it all in for the last thirty years or so.

So I whacked together this box out of scraps of 12mm pine plywood I had lying around, and a handle cut down from an old broomstick.

The little shelf is there to rest your foot on while you're brushing away at your shoe. It's supported underneath by a fairly hefty pine bracket, so it's a lot sturdier than it looks from above. The little curved cutout in the top edge of the divider serves no real function; it's just there because I think it looks nicer than a straight line.

If I had any self-respect, I'd fill all those screw holes. Maybe in another thirty years.

Friday, December 18, 2020

New (Old) Door Handles


I replaced the old knob-style door handles on the door between our kitchen and lounge with these brass lever-style handles.

I wanted levers so that I could open the door with my elbow, when my hands are laden with plates or whatever.

I think, though I'm not sure, that the handles are reproduction, not genuine antique. However, they're solid brass, not plated, and if they are reproductions they're good ones.

Unfortunately, the lock-plates from the old handles had marked the varnish and wood enough that I had to scrape them away. And that means that some time soon I'm going to have to dismount the door, scrape down the whole thing, and re-varnish it.

And so goes the creep of renovation.

Friday, December 4, 2020

Press Trolley


I've been pottering about the last few days making this trolley for my little etching press. It's mostly plywood, though the legs are salvaged from some pine framing timber from the scrap pile. I may, eventually, stain and varnish it, when I get up the gumption to do so.

It has lockable castors on one end only; whether it will need them all round is yet to be seen.

I'll use it to store all my printing clobber as well as the press — inks, brayers, barens, mixing plates and so on. And being on wheels, I can shunt it out of the way when it's not being used, which will be a blessing. Hopefully it won't get so heavy that I have to upgrade the castors; I think these ones are only rated for about 30kg  50kg.

Thursday, November 26, 2020

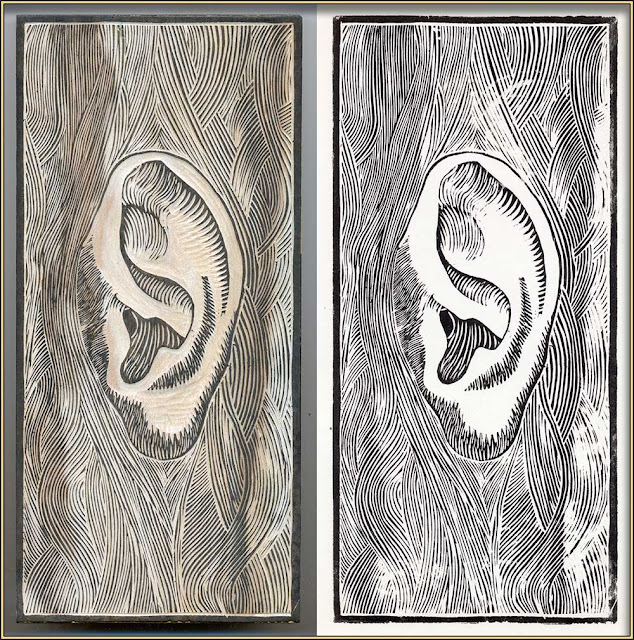
Plywood Block


I thought I would give an ordinary old scrap of 18mm pine plywood a go as a printing block. Results were mixed.

Shown here are scans of the block itself (left) and a print taken from it (right). The print has been reversed horizontally so that it matches the image on the block.

You can see dark bands running from top to bottom of the block; these are from the growth rings in the timber the plywood was made from.

The density of the wood varies quite markedly between summer and winter growth, and that causes problems when cutting from one to the other, as the gouge can unexpectedly dive deeper into the surface, or skip up out of the wood.

Also, the variable density creates variable absorbency when the ink is rolled on to the block, and it swells unevenly across its surface. The effect is miniscule, invisible to the naked eye, but you can see the results in the right-hand side of print. I was using quite a hard brayer to roll on the ink, so it was quite unforgiving of any hollows. The printing issues are exacerbated by the uneven cutting caused by the density variations too.

Apart from the issues created by the growth rings, actually cutting the pine plywood was really quite easy. It was definitely more pleasant than cutting MDF, as there was no dust, and my gouges stayed sharper for longer. For simple prints without any complex line work, I think it would probably be fine. However, for anything other than that, plywood faced with a more homogenous, fine-grained timber would be much better — cherry, for example, or pear.

Sunday, November 22, 2020

New Woodcut, But Old


I started this woodcut quite some time ago, and the key block has been sitting around all that time (since 2017). Now I've also cut a bunch of colour blocks, and I don't think I'll be doing any more cutting, but I have to do some more playing around with the colours because these ones are pretty shite and I'm getting a little bit disheartened.


<< This is the original ballpoint pen drawing I did even longer ago, in 2012 I think.

Warm colour scheme

And this (right) is the latest colour scheme, which I like a lot better than the earlier one.

It needs a certain something, but I haven't quite figured out what.

Sunday, November 8, 2020

Topical Woodblock Print


Colour mock-up
— will probably change a bit
Let's start from the end. This is the completed woodcut in three colours (four if you count the seal stamp). It was printed in "Flint" water-based relief inks on a registration stage, using one of my glass-bead barens.

Process

The design is drawn on to 3mm MDF in Indian ink. That orangy-yellow is just there to make it easy for me to see where I have and haven't cut the MDF away.

MDF has its pluses and minuses as a woodcut medium. It has no grain, and it's easy to cut with sharp tools. It's like very hard lino in that respect, except that you can manage finer detail than you can in lino. On the other hand, it's a bit fibrous and fragile, and it's very easy for small details to be torn away by the pressure of the gouge. Also, the silica in it is pretty hard on edges, and you need to be sharpening a lot more than you would with proper wood or lino.

The wooden handled gouges in the stand (to the right) are all very cheap, and the steel is, frankly, not great. The blue ones in the foreground I got when I was at polytech; they were more expensive, though not desperately so — I think a set cost about thirty bucks — and their steel is much better, taking and keeping a much better edge.


Here's the first test print, to see if or where any more cutting needs to be done. Overall, I'm reasonably happy with it so far.

This is not, I should note, a good print, and it's intended solely for informative purposes. It hasn't been inked up evenly, and it should have more ink on it, but inking up will get more consistent as the old ink seals the rather absorbent surface of the MDF.


Once the key block — the main detail block, usually containing all or most of the outlines — is done, the colour blocks are created by means of an offset printing process.

The blocks are all placed in exactly the same position, kept in place by the black cardboard tabs you can see surrounding it, and the key block is printed on to (in this case) a piece of clear plastic, also locked into position with masking tape. Acetate is better, as it takes the ink better and is more dimensionally stable. Paper is usable, but because it is absorbent it makes the transfer on to the other blocks less reliable.

Once the plastic is printed, key block is removed, and another block is placed into the printing position. The plastic, with its printed image, is lowered on to the new block and the ink rubbed on to its surface. I use a rubber brayer for this.


The process is repeated as many times as is necessary, and now I have a reference image on the colour blocks, exactly the same as the key block, that I can use to exactly register the cutting for each new colour.

I'll do as many blocks as I think I'll need, plus one or two more in case of fuck-ups.

In this case, I'm expecting to want two colours in addition to the key block, and I've done three colour blocks. 


Saturday, October 24, 2020

Plane Repair

Stanley Part No. 12-005-8_3-1-03
Blade adjustment thumbscrew bolt

Thanks to my friend, Bob Bain, who provided the necessary bit from an old plane that was getting binned, my beloved Stanley #3 is back in action.

It's one of my favourites, being very light and handy: though too short and narrow for straightening boards, its diminutive size makes it great for getting into slight hollows, and being so small and light it's not very tiring to use.

It was the very first plane I bought myself, and it needed quite a bit of reconditioning then — it had obviously been pretty roughly handled at one time, and both handles had bits smashed out of them, which I patched.

Also, the blade adjustment screw bolt had had its threads munched up, and the brass adjustment thumb-screw itself was very stiff and difficult to use. I used it in this state for years before deciding I really should do something about it.

Stanley use a weird semi-proprietary format for this bolt: it's a left-hand 9/32" 24 TPI American unified form, for those who need to know that sort of thing. Good luck laying your hands on one of those at your local hardware shop, or a tap/die to make your own. Stanley do still sell them as a kit with the knurled brass knob, but they're not cheap, and by the time postage from the USA is taken into account, they're way too expensive. 

Fortunately, they're interchangeable between all Stanley (and Record, I believe) Bailey-pattern planes, and they're so common you're very likely to be able to pick up a junker second-hand for less than the price of the bolt/screw kit and cannibalize its parts. Which is essentially what I did, except that Bob provided the bits for free. Good man.

For what it's worth, I got the new (old) screw out of its housing by cutting a slot in its end with a hacksaw and just unscrewing it with a screwdriver. You could probably do it by grabbing it with vice-grips or something, with some kind of padding on the jaws, but I didn't want to risk damaging the threads.

Friday, October 23, 2020

Box

320 x 260 x 160 mm

I made a box for keeping some gaming stuff in out of some bits of scrap pine tongue & groove and a couple of bits of 4mm plywood.

All in all, I'm pretty happy with the way it turned out. It's more of a utility box than a piece of heirloom furniture, but it will do the job I want it to do without looking too much like an old beer crate or something.


I used a piano hinge for this box. I'd bought the hinge quite some time ago for another project; I don't even remember what any more, but whatever it was, I didn't use it then.

It should make for a good, long-lasting lid that can take a bit of abuse. Not that abuse is very likely, but you never know.

[NOTE]....... I ended up using the box for my relief printing stuff (inks, brayers, baren, palette knife etc.) instead of gaming doo-dads. So I suppose I'll have to make another one.

Monday, October 19, 2020

Sketchbook

Here are some bits and pieces from one of my most recent sketchbooks.

I like to write little notes to myself, aides-memoire, about new tools or media or whatever, and my impressions of them.

I also write quite a lot of absolute bullshit.

Brush, fibre and ball-point pens

Parker ball-point

6B graphite pencil

Ball-point birds (mostly)


Another Dresser


On to the next project, another dresser restoration.

I've stripped the old varnish off the cupboard door on the right, and the little top curved-faced drawer, and given them a coat of finishing oil. It brings up the colour of the rosewood veneer beautifully, and the whole thing will look pretty luscious, I think, when it's all done. The old varnish is pretty faded and stained, so good riddance to it.

It's going to be a bit trickier than the last restoration though, as there are quite a few fragments of veneer missing, and I'm not sure where to go for replacement stuff. The handles will need attention too; there's only one of the drawer handles that hasn't been broken in the lifetime of this piece, and there's absolutely no chance of being able to buy exact replacements. I'll probably have to make something.

The mirror from this dresser has been transferred to the one I just finished. Whether it gets transferred back again is an issue for a future time.

Friday, October 9, 2020

Recent Productivity


I inherited this old rimu duchess from my friend Sarah. It had had a pretty hard life; the old finish was pretty beaten up, and there were quite a few stains and things that penetrated quite deeply into the wood, but the fundamental structure is still sound. I stripped it down with card scrapers and re-stained it dark to hide as much of the crap as possible, and I replaced the old handles with these ones that I found in amongst my clutter. They're nothing fancy, but I think they suit the form of the thing quite well.


I also scraped down this little side table, also rimu, that Annette found. She has plans for it, I don't know precisely what, so this is as far as I will take it, and the rest is up to her.


I put together this cradle for my Makita electric planer, so that I could lock it into the vice and use it after the fashion of a jointer. It's too small for real accuracy in that respect, but with the addition of a fence I'll be able to use it to get board edges square and that sort of thing. I've used it very seldom, so maybe this will make it a bit more useful.

Tuesday, September 29, 2020

Planes in Order


I've finally got around to organising a permanent home for my planes, in an old filing cabinet at the end of my workbench.

Most of them are sitting on some soft squishy foam tiles in the bottom of the drawer, and there's a plywood sliding till above the #6 and #7 holding my beech rebate plane and a couple of little block planes. I use te #6 and #7 very infrequently, so the till is unlikely to be much of an impediment.

I still have to find a proper home for my #78 rebate and my #45 plough planes — I'll probably end up putting them (and a bunch of other special-purpose tools) in the bottom drawer of the cabinet, which at the moment is full of circular saws.

It's not the perfect position for the cabinet; if I leave the drawer open for easy access, shavings from anything held in the vice will fall straight into it, and when the drawer is fully extended it interferes with turning the vice handle. However, that last is something I can probably address.

I really want a bigger workshop.

Sunday, September 27, 2020

Graphite Stick Holder Thingummy


I'm a sucker for new tools. This one is a mechanical pencil for holding big, fat, greasy, black graphite sticks (or charcoal, or sanguine, or whatever). It came with a raw wood barrel; I gave it a few coats of shellac so that my finger-grease won't make it look too disgusting too fast.

I have another one somewhere that I bought decades ago, but exactly where it is I'm not sure. I was using it as a scraper/burnisher holder for doing mezzotints, but it's not with my printmaking stuff — no doubt I've put it somewhere very safe.

Wednesday, September 23, 2020

Advertising 1950s Style

What do you suppose this magazine advert from the 1950s is pushing?

Did you guess...

shoe polish?

Of course you did. What else could it possibly be?

Friday, September 18, 2020

Dayglo Pixie


Technical pen on Reeves cartridge paper, digital colour

Approx. 70x80mm

New Huion Graphics Tablet

New! With added Glove Power!

My wonderful new toy arrived today, a new Huion Inspiroy graphics tablet to replace my old Huion 1060PLUS graphics tablet which replaced my even older Wacom Intuos, which stopped working in Photoshop, because Adobe are bastards. 

The 1060PLUS was a fine tablet, but it had its minuses: it had good pressure response, but was not tilt-sensitive, and the stylus was powered by an internal battery, which meant that from time to time I'd find that it had no charge. I could run it with the charger cable connected, but that's a bit of a pain; I haven't had to use a corded stylus since my very first Genius tablet back in the stone age.

The Inspiroy fixes both of those issues, and is also a thinner, lighter tablet to boot. It claims 8192 levels of sensitivity: my old Intuos only claimed 1024, and to be honest I haven't really noticed any real difference. More important to me is its 266 PPS sample rate, so drawing is very smooth.

Also, the Inspiroy came with a little slippery half-glove, to keep my hand from sticking to the tablet while I'm drawing, so that's nice. However, it's very synthetic, and I don't know how comfortable it will be to wear for any length of time, and I might just revert to my old soft cotton conservator's glove with the thumb and two first fingers cut off.

I got the shipping notice on August 25th, the same day I ordered it, so it's taken 24 days to get here from China — not too bad, considering the current international situation. It cost a little over a hundred bucks, all up; about one sixth what I paid for the smaller Wacom tablet all those years ago.

Monday, August 31, 2020

Bathroom Flower Arrangement


Annette does some pretty flower arrangements.
This is one of them.

Monday, August 24, 2020

New Computer for Annette

When Annette's last decent computer crapped out, we replaced it (at first) with a HP All-In-One machine that was being disposed of by her work. It seemed pretty good at first contact, and it did have a very nice display, but it turned out (after several hundred dollars of attempted repairs) to be a total lemon.

We tried again with another HP AIO, mainly because it was pretty cheap, but that too turned out to be barely functional. It was grindingly slow, and eventually it fell prey to the AMD video driver curse, which conflicts with the mouse driver and makes the machine almost completely unusable. At first I managed to fix it by rolling back to an earlier driver, but then Windows did a major update which made that impossible.

So, I thought, fuck it. Time for a proper computer.

We reused an old case (though it still needed a new PSU) and the mouse and keyboard, and we got a reconditioned Dell monitor, but everything else is shiny and new and potent and fast. Annette can play Solitaire very, very swiftly.

Everything would be just peachy, except that the Windows 10 installation is terribly unstable; if I tinker at all with any system settings, or attempt to install any software, there's about a 50/50 chance of invoking a BSOD. I suspect some corrupted files in the installation, so I'll try a reinstall/repair and see if that fixes the issues. I certainly hope so.

Update: It was not a corrupt Win10 installation at all, but RAM issues. It turned out that one of the 8GB RAM modules was faulty, and then when we replaced that, it further turned out that one of the RAM banks on the motherboard was faulty. Now we've replaced the motherboard as well, and everything appears to be peachy-keen.

Sunday, August 9, 2020

AA Battery Box

Here's a little 3d printable box to take four AA batteries. I use it to carry rechargeable camera batteries.

It consists of three components: a bottom, a lid, and if you need one, a collar and clip that can be pushed on around the bottom and be glued in place.

The files are available for free download at https://www.thingiverse.com/thing:4565060

Thursday, July 30, 2020

Spammers Ahoy!

Since the porno-spammers appear to have noticed my existence, I've had to turn comment moderation on. It's a faff, but there it is.

Fortunately, comments on the posts on this blog are few and far between. Except for the spammers, recently.

Tuesday, July 7, 2020

Teensy Box


Owing to my defective pancreas, and a liking for a bit of sweetness in my coffee, I have a need to carry artificial sweeteners with me.

I could just carry the pack of sweeteners in my pocket or bag, but then the dispensing mechanism would tend to get gunked up with crud. So I made this little box.

It's fancier.


Friday, June 26, 2020

Digital Watercolour Painting

Krita, GIMP, and Inkscape have all undergone some major improvements lately, to the point where using them exclusively in a professional workflow is not unthinkable.

Krita's latest update included a whole new set of watercolour brushes, which I've been having a brief play with. The canvas texture and the vignette were added in GIMP (which, along with pretty much every other graphics app in existence, still doesn't recognise the native .kra Krita file format).

It's hardly a masterpiece, but then it was only about ten or fifteen minutes work. I'm not all that confident with actual watercolours really, but the digital version is a bit easier to work with (though much more limited, of course).
EDIT: I've just discovered that it's not actually possible to print direct from Krita, which I have to confess surprised me more than a little. You have to export the image to another format (.jpg, .pdf, or whatever) and print it via another application. That, to me, is a pretty big shortcoming in any graphics app these days.

Friday, June 19, 2020

Greater Lovecraft Hath No Man


I don't get the enduring appeal of H. P. Lovecraft.

There is no doubt that he was highly influential, but I find his own writings turgid, overblown, and not in the least bit frightening.

Plus, he was a terrible, awful human being. Not that an author has to be a good person to be a good writer, but it's helpful if you can read their work without thinking constantly about their appalling attitudes. Also, it's helpful if they're actually a good writer.

Saturday, June 6, 2020

The Book of Ten Thousand Things

Today we encountered a car-boot sale, where we picked up this book for a dollar: The Book of Ten Thousand Things, edited by Arthur Mee, famed editor of The Children's Encylopaedia and the Children's Newspaper. This is a supplementary volume to a series of twelve books called The Children's Treasure House.

Ten thousand things for a dollar is pretty good value for money, I think.

Arthur Mee was active at the end of the 19th century, and the first part of the 20th. He was quite unabashedly a British Protestant exceptionalist, and his children's books were full of inspiring patriotic and moral tales to make the youth of Britain ready for the administration of Empire.

He was not at all averse to explaining just how all the non-Christian, non-Protestant religions of the world were wrong and bad, and that Catholics (for example), while many of them good at heart, were basically poor deluded fools, while Buddhists, Hindus and the like were barely better than animals.

Although he didn't say so in so many words, one got the sense that he felt pretty much the same about anybody who had the misfortune to be non-British.

Anyway, here's a little sampling of this particular gem of a volume.

Fifteen BAD things

Beware of the hidden celluloid menace!

Carriage spotter's guide

A selection of colonialist exploiters

25 uses for asbestos (!)

Some science experiments for children

How things got their names

British Medals of the Empire

Badges of the Scouts and Guides

Tuesday, May 12, 2020

LED there be light!

I've replaced the fluorescent tube I used to have hanging over my modelling workspace with an LED lighting panel that I was given by my electrician friend, Dallas.

It gives me a nice diffuse, bright light. It's a little warm in tone perhaps, but it's an improvement on the weird greenish light I got out of the fluorescent.