
I scribbled this some time back in 2017-18, and just got around to colouring it with Faber-Castell aquarelle pencils.
The others (below) I did relatively recently, while up in the Bay of Plenty.


I scribbled this some time back in 2017-18, and just got around to colouring it with Faber-Castell aquarelle pencils.
The others (below) I did relatively recently, while up in the Bay of Plenty.

This one is finished now.
I've added a flat desaturated blue, which both pushes the raindrops into the background and disguises to a certain extent the faulty printing in the centre area.
Linocut 150 x 150 mm
Flint water-based inks on unidentified heavy hot-press paper


I found some actual real lino to make linocuts with. I've had it sitting there for years, and just found it when I was looking for something else entirely. So, I thought I would cut some lino with it.
This is the inked-up block, after its second inking. It's 150 x 150 mm.
 |
 |
Printing was not very successful at all.
The print on the left was printed in my nipping press, and then rubbed vigorously with a baren because I suspected that the ink transfer wasn't entirely successful, as indeed it was not.
The one on the right was run through my little roller press.
Neither of them are very good at all, due I think to a combination of factors.
My workroom was pretty cold, so the ink was very stiff. I rolled up the block with a very hard EssDee brayer, so the ink wasn't pushed down into any unevenness in the surface of the block, of which it seems there are many in this natural lino. The lino itself is very hard, so it doesn't squish at all. And the paper surface is also quite hard, so it doesn't conform well either.
I think the extra-hard brayers would be better suited to wood engraving, or maybe relief inking of intaglio plates, than to the sort of thing that I do. I prefer something with a bit more give in it.

Linocut, 107x147mm
The final print was done on Fabriano Tiepolo paper, which is a smooth-surfaced 290gsm stock, very well suited for printmaking.
If you compare this one with the test print below, which was done on ordinary desktop printer paper, you can see how much better the Fabriano paper takes up the ink.
 |
| Blind Stamping |
I've included my seal stamp by Blind Stamping, in which the block is impressed into the paper without any ink.
It's different from watermarking, which you can also see an example of in the bottom right: a watermark is laid into the mesh that the wet pulp is laid on to make the sheet, and the resulting pattern shows in the finished paper.

(90gsm printer paper)
I've experimented with the blocks a bit in this one.
The key block (the outlines) is in no way unusual. It was printed in burnt sienna.
The background (the sky and plane) had the foreground silhouettes cut out, and then the block was cut in half along the horizon line and inked up separately. I cut a horizon line before I decided to cut the block in half, which is why there's a white line there.
The sky block was inked with a red-yellow gradient, the plane with a simple solid chrome yellow.
The blue block was quite straightforward. I had to do quite a bit of cleaning of the block before printing to avoid printing-in, and I'll probably end up cutting all those open areas away completely.
The last block, with the colour areas for the man's face and trousers, was cut only locally where there was detail. I inked in the face area by dabbing ink on to the block with my finger, and the trouser area was inked up through a paper stencil.

It comes as no surprise that paper quality affects print quality, but this I didn't expect to such a degree: the Winsor & Newton cartridge paper gives a perceptibly fuzzier and chalkier print than the Fabriano drawing paper. The difference is even more apparent in real life than in the photo.
The Fabriano is smoother and stiffer than the W&N for a start; I suspect that it's been sized and polished, so the ink sits more on the surface and sinks in less. That would certainly explain the crisper edges.

https://www.thingiverse.com/thing:6134612
I designed and printed a rotating turntable holder for my Pfeil palm gouges for lino and wood cutting. It holds up to nine gouges, and when assembled it stands about 170mm tall.
It requires a 22mm skateboard bearing for the turntable, and I added a couple of disks of baking paper under the cap to provide a low-friction surface.
I'll probably turn a wooden base for it to stand on at some point.
 |
 |
 |

I turned a base for the turntable from an old lump of rimu.
It's a raggedy, split bit of wood, and not a great piece of wood turning, but it will do the job.
I've also put the gouge number and profile on the top of the wooden mushroom, so that I can distinguish between them at a glance. It's not difficult to tell them apart by the blade when they're of a decent size, but the teensier tinier gouges all look quite similar to my tired old eyes.

I made another one.
It's fundamentally the same as the first, just different in detail (and colour).
I included some countersunk holes around the bottom this time, so that it could be screwed to its wooden base instead of being glued.

A few years ago, after a small windfall, I bought myself this little intaglio press. It's sold by an Italian company called RGM, and it's fundamentally identical to the Fome portable press available from Jackson's. So similar in fact that I strongly suspect that they're all just pumped out of a factory somewhere in China and re-badged by the end sellers. It's a decent, fairly well-engineered, entry-level press that doesn't take up a lot of room, but it's not without its issues.

The hand-crank supplied with the press is just stamped from a sheet of mild steel, and it's not nearly strong enough. Mine started to bend when the press was under even moderate pressure. I replaced that with a cast iron pulley wheel taken from an old pump, and that works much better, although its spokes can interfere a bit with the pressure adjustment screw on that side.
The other major issue is the bed, which was just a piece of 270mm wide 3mm stainless steel. It was adequate, but the felts and paper and everything tended to slide on its surface when they came up against the roller. I replaced that with a piece of 12mm plywood, a bit longer than the original bed. The knurled lower roller grips the wood very positively, and the felts stay in place on top. There's a possibility that it may end up being warped by the pressure of the rollers, but if that happens it's a very cheap and easy thing to replace.
The third issue, and it's one that I don't think I can do anything about, is the diameter of the rollers. They're only 34mm in diameter, and ideally I'd prefer them to be at least double that. The small diameter means that there's quite a steep angle of attack when the roller meets the plate, which is not ideal. However, they do work, and the press will produce pretty good prints, up to about A4 in size.

It's just some lengths of 3mm MDF glued into angled slots in a couple of battens, and the battens glued to a bit of 9mm MDF. I put a couple of hooks on it to hang it, as shown here, or else I can use it down flat, with the prints resting on edge. The hanging version is more convenient, as it keeps the drying prints up and out of the way.
This rack will cater to up to sixteen prints, which should be plenty. I seldom do more than eight or ten at a time. It handles A4-ish paper fine, and should be able to support larger sheets as well, though that would depend on the weight of the paper. Anything more than about A3 would probably tend to droop at the ends, I would think.

I don't know what this paper is; it's a scrap I fished out of a pile of scraps. It feels like about 240gsm or thereabouts, and I think it might be a hot-press watercolour paper.
There's a tiny bit of cutting left to do, and then I think it's about done and ready for a proper print run.

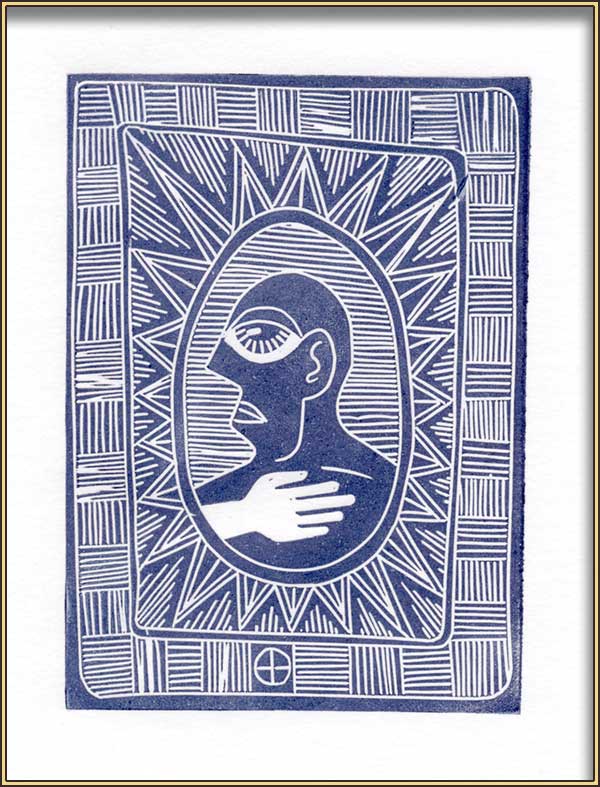
"In the land of the blind, the one-eyed man is king"
Linocut, 105 x 150 mm
I have not yet decided whether or not to add a second or third colour block to this. I probably will, eventually.
 |
I bought myself a little Esselte lino cutter and a couple of blades, because I wanted a narrow U-gouge that I didn't have amongst all my other cutter profiles. It was cheap. Something I didn't anticipate is that the blades for these are sharpened with an inside bevel, unlike my woodcut gouges. That makes them quite a bit harder to sharpen, and also they tend to dive into the carving block rather than rising out of it — something to watch out for.

Starting to play with colour blocks now.
The registration isn't great, but that's not hugely important for this purpose.

I decided that I want the body of the king to be a different colour than his crown. But rather than cut a whole new block, and cut out the body area on the crown block, I just cut out the body with a jeweller's saw to make a sort of jigsaw arrangement.
This way I can ink up the two areas separately and then reassemble them and print them simultaneously, or else I can glue the body bit to a piece of paper the same size as the other blocks so that it will fit into the registration jig and be printed separately.
The jeweller's saw gives me a kerf of about half a millimetre, which would be enough to show up in a print as a perceptible white line, but it will be underneath the key block so it shouldn't be too obvious.

I transferred the image of the key block to the colour blocks by means of the offset transfer method, which is quick, easy, and effective. However, the black ink I used for the transfer is reactivated by the coloured inks on top of it, and a shadow image of the key line is printed along with the colour.
I expect that if I waited long enough the ink would cure enough to not be reactivated, but that would be a faff. Alternate strategies might be to do the transfer using a very light, transparent mix of ink, just visible enough to act as a cutting guide, or else to do it using an oil-based ink that would not be affected by the water-based inks going on over the top.
In truth, the shadow printing shouldn't affect the final print to any great degree, since the key block will be printed over the top of it. But I would quite like not to have it happen at all.

 |
It's been cut entirely with the Pfeill #11 sweep/veiner I showed in my last post.
As you can see, there's almost no variation in line weight, as you would get when using a vee-gouge. It's kind of the block-printing version of a technical pen.
As an aside, clearing out the pure white areas with a #11 is a real pain. It's not something I would have done if I hadn't vowed to use no other tools on this piece.

This specific one is a #11 sweep or veiner; it's a tiny U-gouge that creates a very regular fine line. It's not impossible to modulate the line, but there's not much scope for variation in the line it creates.

It's held with the mushroom-shaped handle against the heel of the palm, with the fingers wrapped around it and the index finger right out near the tip for accuracy of steering.
The flat on the bottom, as well as keeping the tool from rolling around all over your workbench, provides a place for the last two fingers to rest. It's a comfortable grip, developed over centuries, and it's my favourite style of grip for block cutting.
My only issue with it is that the hard edge of the mushroom can start to dig into my little finger if I'm using the tool for long stretches.

Fortunately, the fix is very easy indeed.
I just knock off the corner that my finger rests on by scraping and sanding it with very fine sandpaper. Not a lot of material needs to be removed, just enough to get rid of the hard corner on that side.
The tool handles are made of pear wood I think, and they work very easily.

 |
| EssDee SoftCut |

The material has a slightly textured side and a very smooth side. Neither side responds at all to the solvent transfer method of transferring an image to the block.
You can draw directly on the block with a pencil or Sharpie, but in the case of the Sharpie you must clean off the block before inking up or else the Sharpie ink will also be printed.

I've learned some more about handling this block material by cutting this little 75x105mm doodle.
I can make the cutting more obvious by scribbling over the block with a Sharpie before I start drawing, and then wash it (incompletely) with meths or isopropyl. This creates a stain on the surface of the block, so that the fresh cuts stand out a lot more.
Note: the before drawing is important, as otherwise you'd be likely to wash off your drawing at the same time.
Another thing, an annoyance, is that the action of the cutter through the rubbery material creates a static cling, and the swarf tends to gather in the hollow of the cutter and obscure my view of just where the edge is. It won't just come out by tapping, as the bits are all electrostatically attracted to both the cutter and each other, so I keep a brush handy to brush them out.
Yet another thing is that, unlike MDF, this rubber block is absolutely unabsorbent. That means that with repeated inkings, ink will tend to gather in the edges of cuts and will fill in very small hollows. It's easy enough to mitigate though, once you know it's an issue: a blind pressing or two on some very absorbent tissue (toilet paper is ideal) will help, and if worst comes to worst the block can be washed out before proceeding.

This is a state proof of a little woodcut, only 60x120 mm, cut into a fragment of MDF.
I was originally planning to cut away the background, but now, having seen it sitting in its black block, I'm not so sure about that.

I took a few impressions from a linocut I carved a few years ago, printed with the nipping press I got today from Bob.
Apart from the one on a page from the phone book, they're all just on A5 copy paper, about 90gsm I think. The ink is Flint water-based relief ink. Printing went very, very easily with the plate on a 3mm grey-board baseboard, the paper over that, and a very thin felt over all. It's a lot quicker and easier to manipulate than the roller press, and MUCH easier than printing with a baren. The longest part of each print, as always, is rolling ink on to the plate.
I think the ink impression is less even than that I get from the roller press, but that might be down to the rolling-up. I don't mind a bit of irregularity in any case, as long as it's not too extreme; it adds a bit of character to the surface.
The image is 105 x 145 mm, so fairly small. There's room in the press for a bit over A4, but the inverse square law means that an increase in the area being squished requires increasingly more pressure to achieve the same results. I'll try a larger print, but my suspicion is that the largest practicable print size will be smaller than A4. We shall see.

I did some multi-colour tests today, one lot on dampened 300gsm watercolour paper (left), and the other on the same 90gsm copy paper I used yesterday (below), printed dry.
The watercolour paper was a sad failure, with a very bad lack of consistency, and in one case the surface of the paper glued itself to the plate and tore away.
Admittedly, the paper isn't intended for printmaking, and maybe should have just been printed dry. The combination of the weight and surface texture made printing with the nipping press sub-optimal.
On the first one I did (top right) I got the sky gradient upside down. Doh!

The lighter, smoother copy paper returned much better results.
The fields of colour are much more consistent.
I shall have to see what I can get hold of in the way of relatively light-weight acid-free hot-press paper.

The nipping press has, at some stage, had its baseplate replaced with a piece of a big U-girder. It is bloody heavy. It could do with a bit of TLC, but it's really all cosmetic , and since I'll be using it with packing boards in any case I could really just use it as is. However, a bit of cleaning up will do no harm.
There are also four wooden planes: from left to right, a rabbet plane, a shoulder plane, a ¼" grooving plane, and a small moulding plane. They're all in pretty good nick apart from some cosmetic scruffiness, and from first acquaintance I think they'll just need a bit of sharpening and polishing.

I disassembled it, took all the rust off the baseplate and scrubbed down the superstructure with a degreasing solvent, masked off the screw and gave everything a couple of coats of spray enamel.
Now it looks a lot tidier.
It was a lot easier to move around in two pieces. A lot easier. A bit tricky to reassemble though, but I got there in the end.


Following along with my habit of spending more time making tools to do a job than doing the actual job, today I made myself a little awl for punching holes in signatures for bookbinding.
It's made of oak, a little bit of 10mm brass pipe, and a mattress needle, and it's about 130mm long. I flattened off one side so that it won't roll around and fall off my work table.

Today I made another awl, for punching larger holes if need be.
The actual spike came from an el-cheapo plastic-handled awl, but it's hardened steel so it should serve well in its fancy new oak handle.

I've done some bookbinding before, but I never really knew what I was doing — I was just guessing really. This is the first time I've actually followed any sort of instruction. In the photo it's sitting splayed out to dry overnight.
It's a very slender volume, just 48 pages (so 24 leaves), roughly A4. The text block is just a double-fan glue binding; I would have liked to try stitching it, but I don't have access to an A3 printer to make folded signatures of this size. The cover is a bradel binding, and I made the book-cloth covering from a scrap of printed cotton, saturated with a paste and acrylic medium mix to give it some stiffness and prevent glue strike-through.
The boards are 3mm grey-board. I could have gone a bit thinner I think; 2mm would have been quite adequate. They've warped a bit with all the glue, and I'll see if they settle down as everything dries out properly. If not, maybe a bit of clamping will help. And if it doesn't... well, it's not the end of the world.

This binding is more successful for various reasons, but not least because I did leave enough space at the spine this time for it to open fully flat
Also, this one is stitched rather than double-fan glued, and it's (roughly) A5.