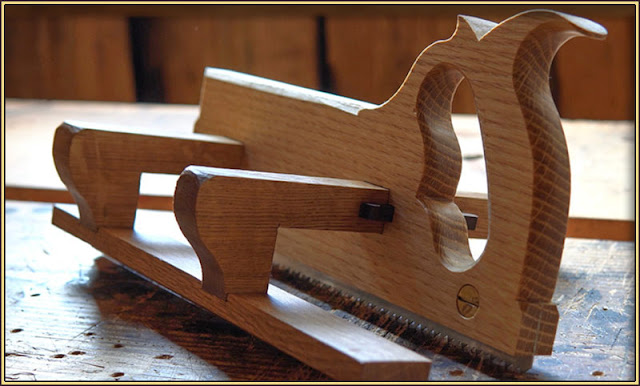
Quite some time ago I made myself a kerfing plane out of some ash offcuts and a Bahco gent's saw.
It works okay, but it is rather heavy and clumsy to use, so I intend to make a replacement.
I got some plans for a much nicer one from Nic Taylor Woodworking — they're pretty straightforward, and they only cost five YankeeBucks.
He has a video on Youtube of the construction process, which is useful but not really essential viewing.
He made his from some quarter-sawn oak, but I think I'll use some beech I have sitting up in the rafters of my workshop. It's New Zealand beech, which isn't quite as good for toolmaking as European beech as it grows much faster and has a less dense grain as a result, but it's still a good, stable timber that is easy to work.
2023-05-28: the plate
The body of the new plane is sitting there in the background. There's still some shaping left to do on it, but it looks much as it will when it's eventually finished.
I am making the saw plate for the plane from scratch, using a piece of metal cut out of an el-cheapo throwaway hand-saw.
The first step, after cutting out the blank, is to cut slots at regular intervals along the edge. These will form the gullets between the teeth.
I'm doing 8tpi (teeth per inch), mainly because it was easy to measure. That's a relatively coarse tooth ratio, but it will do for a start. If I find I want a finer tooth than that, I'll probably just repurpose a cheap gent's saw, as I did for my old kerfing plane.
I'm using a plywood cutting guide which guarantees that the tooth spacing is regular and accurate. When I get to the end of the guide, I just realign the plate with the last slot I cut lined up with the first slot on the guide, and start cutting again. There's also a piece of 3mm MDF in front of the plate which gives me a depth stop.
Here's the plate with all its gullets cut, ready for me to start filing the tooth profiles. They're not nearly as regular in depth as they could be, but it's the spacing that is the most important.
I destroyed two hacksaw blades in the first fifth or so of the cutting, owing to having blades that appeared to be best suited for cutting cheese rather than hard metal. However, now I've bought some decent blades and the remainder of the cutting went much more smoothly.
I have cut the gullets a bit deeper than they strictly need to be, as the extra length reduces the wear on the saw file. The corners of the file gets the most punishment when it's filing into fresh steel, and having a long gullet slot moves that wear point on to the sides of the file, which are much sturdier, and the file therefore lasts a lot longer.
Here are the teeth in the process of being shaped.
It's exactly the same process as sharpening an existing plate, except that each tooth requires more filing. I'm filing all of these teeth symmetrically, with no rake at all, which means they'll cut equally well (or poorly) going forward and backwards. I may find that I have to give them a bit of rake, but that's easy enough to attend to later on if need be.
At the moment the teeth have no set at all, which would cause issues with the blade sticking in its cut. I will give them a bit of set, but a lot less than I'd normally use for a 8tpi saw as it's never going to be cutting very deep, and I want to keep the slot it creates as thin as possible..
2023-05-29: the fence
The fence will be mounted on two bars, running through mortices in the body of the plane.
The mortices have to be dead straight and square, or else the fence will bind as it's moved back and forth.
The runners will eventually be secured by a pair of wedges; I have not yet cut the housings for those.
The ends of the bars, on which the fence itself will be mounted, get a little bit of shaping. There's not really any functional purpose to this as far as I can see; it just makes it look nicer, which is of value in itself.
The fence will be mounted on a pair of pillars, so that it just clears the bottom of the plate when it is mounted.
The fence is complete, and I've done a bit of shaping refinement on the body.
All that remains now is the cut the housings for the fence runner wedges (and make the wedges themselves).
2023-05-30 - last stages
Now I've cut the housings for the wedges, and made the wedges themselves. I made the wedges from oak rather than beech.
I've given everything a coat of oil, and in a few hours I'll put on a couple of coats of wax, mount the plate, and it will be done.


No comments:
Post a Comment