Thursday, November 26, 2020

Plywood Block


I thought I would give an ordinary old scrap of 18mm pine plywood a go as a printing block. Results were mixed.

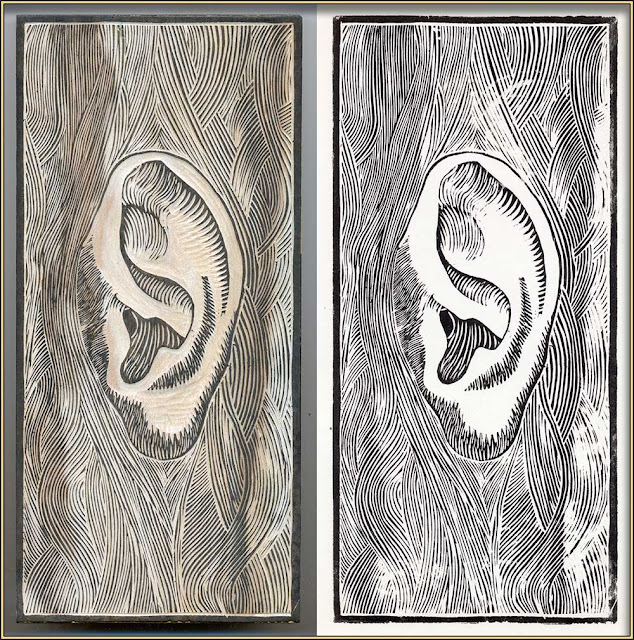
Shown here are scans of the block itself (left) and a print taken from it (right). The print has been reversed horizontally so that it matches the image on the block.

You can see dark bands running from top to bottom of the block; these are from the growth rings in the timber the plywood was made from.

The density of the wood varies quite markedly between summer and winter growth, and that causes problems when cutting from one to the other, as the gouge can unexpectedly dive deeper into the surface, or skip up out of the wood.

Also, the variable density creates variable absorbency when the ink is rolled on to the block, and it swells unevenly across its surface. The effect is miniscule, invisible to the naked eye, but you can see the results in the right-hand side of print. I was using quite a hard brayer to roll on the ink, so it was quite unforgiving of any hollows. The printing issues are exacerbated by the uneven cutting caused by the density variations too.

Apart from the issues created by the growth rings, actually cutting the pine plywood was really quite easy. It was definitely more pleasant than cutting MDF, as there was no dust, and my gouges stayed sharper for longer. For simple prints without any complex line work, I think it would probably be fine. However, for anything other than that, plywood faced with a more homogenous, fine-grained timber would be much better — cherry, for example, or pear.
Sunday, November 22, 2020

New Woodcut, But Old


I started this woodcut quite some time ago, and the key block has been sitting around all that time (since 2017). Now I've also cut a bunch of colour blocks, and I don't think I'll be doing any more cutting, but I have to do some more playing around with the colours because these ones are pretty shite and I'm getting a little bit disheartened.


<< This is the original ballpoint pen drawing I did even longer ago, in 2012 I think.

Warm colour scheme

And this (right) is the latest colour scheme, which I like a lot better than the earlier one.

It needs a certain something, but I haven't quite figured out what.

Sunday, November 8, 2020

Topical Woodblock Print


Colour mock-up
— will probably change a bit
Let's start from the end. This is the completed woodcut in three colours (four if you count the seal stamp). It was printed in "Flint" water-based relief inks on a registration stage, using one of my glass-bead barens.

Process

The design is drawn on to 3mm MDF in Indian ink. That orangy-yellow is just there to make it easy for me to see where I have and haven't cut the MDF away.

MDF has its pluses and minuses as a woodcut medium. It has no grain, and it's easy to cut with sharp tools. It's like very hard lino in that respect, except that you can manage finer detail than you can in lino. On the other hand, it's a bit fibrous and fragile, and it's very easy for small details to be torn away by the pressure of the gouge. Also, the silica in it is pretty hard on edges, and you need to be sharpening a lot more than you would with proper wood or lino.

The wooden handled gouges in the stand (to the right) are all very cheap, and the steel is, frankly, not great. The blue ones in the foreground I got when I was at polytech; they were more expensive, though not desperately so — I think a set cost about thirty bucks — and their steel is much better, taking and keeping a much better edge.


Here's the first test print, to see if or where any more cutting needs to be done. Overall, I'm reasonably happy with it so far.

This is not, I should note, a good print, and it's intended solely for informative purposes. It hasn't been inked up evenly, and it should have more ink on it, but inking up will get more consistent as the old ink seals the rather absorbent surface of the MDF.


Once the key block — the main detail block, usually containing all or most of the outlines — is done, the colour blocks are created by means of an offset printing process.

The blocks are all placed in exactly the same position, kept in place by the black cardboard tabs you can see surrounding it, and the key block is printed on to (in this case) a piece of clear plastic, also locked into position with masking tape. Acetate is better, as it takes the ink better and is more dimensionally stable. Paper is usable, but because it is absorbent it makes the transfer on to the other blocks less reliable.

Once the plastic is printed, key block is removed, and another block is placed into the printing position. The plastic, with its printed image, is lowered on to the new block and the ink rubbed on to its surface. I use a rubber brayer for this.


The process is repeated as many times as is necessary, and now I have a reference image on the colour blocks, exactly the same as the key block, that I can use to exactly register the cutting for each new colour.

I'll do as many blocks as I think I'll need, plus one or two more in case of fuck-ups.

In this case, I'm expecting to want two colours in addition to the key block, and I've done three colour blocks.